Sunday, 4 May 2014

Premiere Progression Blog Post 33

Arrow Shot Clip

 I will now be adding a new clip to the trailer. This clip will go after the Shields Clip. This clip is based on the main character. originally this clip was after the shooting arrow clip, but some reason I did not place it back there and by that time I sorted all my transitions out I thought it was best not to mess with it a lot. However, I did use this clip after the shield clip. I mainly used this clip because there were not many clips of the main character. I also found this clips really effective because it is based on the main character being attacked themselves. Though this clip does look quite effective after the shields because after this clip there will be another fight clip, so I guess that is a bonus. I will be taking this Arrow Shot clip from Tombraider Walkthough.

I made sure that the source tab was on in the viewing panel and dragged the walk-through to the viewing panel. I then used the In and Out Tool to make a mark at 00:45:06:23 and 00:45:07:10. This clip is where shards of glass fall onto the floor. I then dragged the clip down into the Project Clips Bin and renamed it 'Arrow Shot'.

Arrow Shot Clip in the Project Clips Folder
I then dragged the clip to the timeline at the end of the end of the music. The only problem with the clip was the writing on the clip which needed to be removed.

So, I started by separating the video and the audio, however, this time I kept the audio. I did this by right clicking on the clip on the timeline and went to Unlink. I then selected the audio and deleted it because I did not want the audio as I was going to be using different audio music for it. 
Arrow Shot Clip Unlinked and the Audio Deleted
So, I have decided to try to resize the clip so that there are two black lines which will match with the previous clips by double clicking on the clip in the view panel on the right hand side of the screen. However, this did not work very well, because I resized the clip with a corner square, then tried to widen it with a square on the right hand side, and it just resized it in the wrong way. So, My only option at the moment is to crop it.
I used the crop and it worked out loads better than I anticipated. I thought that I would be loosing a lot of the video clip from both the top and the bottom, however I did not. Which was a big relief, otherwise I would have had to go back and resize all of the clips, meaning that I could loose quality and become pixelated.
To get to the crop I went to the Effects Panel > Video Effects > Transform > Crop. I then selected the clip and then clicked on Effects Control. I changed the crop percentages for both the top and the bottom only. This is because I still wanted the width to be the same size as the fit, but I wanted to cut some off the top and the bottom on that it matched the previous clips [as mentioned above]. I only went with 20% because it was enough that it looked like the other clips, but also enough that a lot of the clip is still in tack and that you can still see everything that happens. 
Video Effect: Transform: Crop. Crop Settings
I did not cut the clip because there was not point as the clip only lasted about 2-3 seconds and there was enough video already there that it would not take over the trailer. I also did not change anything in terms of effects. This is because I really liked the darkness it almost felt like the main character was trying to escape the castle on an evening watch. I also felt that the lighting already perfect on the clip especially where the fires were and then the lighting on the main character from the fire.
Tools I have used in this post:

  • In and Out tool
  • Unlink
  • Resize
  • Crop

Premiere Progression Blog Post 32

Transitions


Now I again have a few more clips for the trailer I am going to be adding some transitions to them to make them look more consistent and also make it so that the clips are just not playing one after another.

Transition between the Birds/Witch and Water Clip

For this transition I have tried a few of the different Dissolve transitions. However, out of them all I have decided to use Dip to White. This transition works just like the Dip to black transition except going to black it goes to white. I choose this for these clips because I thought this looked quite effective especially with the bright white from the witch clip. Also, I have tried other transitions such as Film Dissolve with the clip on top of another clip. I have found that it did not work as well because the top clip will still be playing whilst the transition is going onto the next clip. Whereas dipping it to a colour makes the two clip look like they are being ended. I have made the transition custom because I did not want the dip to last really long within both the clips because the bird clip does not really last as long. But also I thought that making the transition quick but enough that you can see it would, look really effective.

Video Transition: Dissolve: Dip to White. Dip to White Settings.
Transition between the Water and Shard Clip

For these clips I did not use a transition. This is because the water clip at the end already dips to a black colour at the end of the clip. This saves me a little time of making a transition and making it custom when it is already there and it looks really effective between the two clips. I think that it really works because the water clip gradually blackens into the colour and then another clip is produced after.

Transition between the Shard and Shooting Arrow Clip

For this transition I decided to try something different and a transition which I have not used once within the trailer within the Dissolve Folder which was Dither Dissolve. This transition makes the gap between the two clips dither by placing a sort of patterned picture onto the clips. It almost makes the clips look like the they are fading as well. I thought this looked quite effective between these two clips. I am not really sure why, but it kind of almost reminds me of a television when the signal sort of flickers into the screen.

Video Transition: Dissolve: Dither Dissolve. Dither Dissolve Setting.
Transition between the Shooting Arrow and Carrying Clip

For this transition I have tried a few different ones. However, I went back and used one of my favorite transitions which was Film Dissolve. If I could I would use this transition throughout the whole trailer, but I didn't as I wanted variety. I thought this transition was the best for these two clips because I wanted the clips to gradually go from one to another having the fading effect but you are still able to see the two clips. This goes with the idea I had for clips anyway as it kind of looks like the main character has been shot, which is why I wanted the gradual fade between the two clips.

Video Transition: Dissolve: Film Dissolve. Film Dissolve Settings

 Transition between the Carrying and Shard Warrior 2 Clip

 For this transition I have tried again a few different ones, however, I found that the best one was Cross Dissolve. This transition worked really well and I think this will work really well later for the clip on clip effect I want to do again for the carry clip. I think this will make the trailer and the two clips look more consistent because it makes the first clip fade a lot then fade back up to the shard clip. This will definitely help when the second clip is added on top of the carrying clip.

Video Transition: Dissolve: Cross Dissolve. Cross Dissolve Settings.

 Transition between the Shard Warrior 2 and Shields Clip

Again I have chosen my favorite transition between these two clips. I think this transition really works between these two clips because you are still able to see the rest of the action of the first clip and start of the action on the next clip. It almost makes it like the clip on top of another effect except next to each other. I think it is effective because you are still able to picture the battle which will still be happening but in two different perspectives but also at two different places.

Video Transition: Dissolve: Film Dissolve. Film Dissolve Settings.

Premiere Progression Blog Post 31

Shields Clip

I will now be adding a new clip to the trailer. This clip will go after the Shard Warrior 2 clip. I choose to have this clip because to be honest, there were not many other clips which I thought would work well with the trailer. This was one reason I choose this clip. The second reason was because I like the clip itself. I like the way the two armies kind of run into each other ready to fight. I thought this brought a bit more drama into the trailer. I will be taking this shields clip from VTS_08_4_x264.
I made sure that the source tab was on in the viewing panel and dragged the walk-through to the viewing panel. I then used the In and Out Tool to make a mark at 00:08:09:01 and 00:08:12:00. This clip is where shards of glass fall onto the floor. I then dragged the clip down into the Project Clips Bin and renamed it 'Shields'.

Shields Clip in Project Clips Bin
I then dragged the clip to the timeline at the end of the end of the music. The only problem with the clip was the writing on the clip which needed to be removed.


So, I started by separating the video and the audio, however, this time I kept the audio. I did this by right clicking on the clip on the timeline and went to Unlink. I then selected the audio and deleted it because I did not want the audio as I was going to be using different audio music for it.

Shield Clip on the timeline unlinked and audio deleted
I then moved onto to resizing the clip. I did this by double clicking on the clip in the clip view panel (right hand side viewing panel) till an orange lining around the clips and had little squares which I used to resize the clip. I resized the clip that the edges of the clip were touching the overall fit of the trailer.
Clip in resize mode
Here is the result.

 I then went and cropped the clip. I did this by going to the Effects panel tab in the same section as the project bins and then went to Video Effects > Transform > Crop. I then went into the Effects Control panel to the crop settings. I then set the crop percentage for the bottom only because there is text on the clip which I do not want to be viewed in the trailer. So, I set the percentage for the bottom crop at 21%. This was enough to crop the writing and enough that it did not take up much of the clip up either. I then repositioned the clip so that the two black lines on the clip were even at both the top and the bottom of the clip.

Video Effect: Transform: Crop. Crop Settings.
Here is the final result

Clip Repositioned
I did not cut up the clip because I felt that the clip was long enough that you were able to see the the character being carried, but it was not too long that it took over the trailer. For this clip, I decided to try and add a little more sunset light to this clip. I thought this might bring the sunset lighting which I also had on the army walking to the castle and the arrowing being shot on the beach. I thought this might be a good effect to give as the light will still be there on that certain day as technically within the film this would be a whole scene, but obviously split up for the trailer. However, I do not want to add too much that the red overpowered the clip. So I added enough red that you can see it and make it look like some sunset light has reached the court.

I did this by going to the Effects Panel which is located on the same section as the project. I then went to Video Effects > Colour Correction > Colour Balance. I then went into the Effects Control Panel and changed the RBG colour effects for the red colours only. As, I mentioned above I changed the settings so that the red was natural, but enough that you could notice it.

Video Effects: Colour Correction: Colour Balance. Colour Balance Settings
Tools I have used in this post:

  • In and Out tool
  • Unlink
  • Resize
  • Crop
  • Colour Balance


Trailer Evaluation

Evaluation

Now I have completed my trailer I am going to be evaluating the trailer. Overall, I am happy with my trailer. I am happy how the project went, I thought that this program was going to be to operate with, however it really surprised me, it was one of the easiest Adobe software that I have used. The structure of the program made it really easy to use. I think this is one reason why I am happy with my trailer because it made it so easy to cut clips and place them in an order that I was happy with and it made it look really professional.

The trailer itself, I feel that this trailer was well constructed and it follows me storyboard really well, expect where I have changed a few items such as the ending; however, I have stated within the blog posts why I have changed these endings or changed the order. I really liked the idea of me doing the storyboard as I felt really professional and it made me feel that I really thought out my trailer (well half of it).

Out of the entire trailer the best part and most favorite part was the first half of the trailer from the start to the character falling clip/titles. This is the part I actually had the most input into, this is because I already had this idea in mind and wanted it on the trailer, unlike the second half. The only part on the second half I actually thought and wanted (before it changed) was ending where the character was jumping and ended with the title. I felt that I should have put more thought into that half of the trailer, as when I look at my trailer I sometimes think I just slapped a load of clips together and hoped for the best; even thought I am happy with it and the order. However, on a lighter note I also feel that I have really made the trailer really professional and look like a real trailer (due to the video transitions). 

There are a couple of items which I am not very happy with the trailer. The first was that I was not happy that I did not use as many of the video effects as I could. For instance, I used the crop video effect a lot within the trailer due to writing the video, or adding a black line at the top and the bottom of a clip to make it blend in because you have had to crop other clips. Another video effect I have really used a couple of times is the Colour Balance, where you are able to change the colour balance of the clip. I have used this a couple of times to make some clips look more like they are in a sunset scene as I found the clips to be too bright and cheery. Overall though, I found it tough to use them because some of the clips were perfect as they already were it hard to find ways in which to give them my own twist. However, another reason I did not use them was because I found that they did not really fit within the idea which I wanted for the trailer. This is why I used clips on top of another. I think I did this a few time to make up for the effects which I did not use within the clips themselves, to make look as if I did use effects when I did not. 

Another item I ma not happy with are the blog posts themselves about the trailer. I am happy with the fact that I stated why I changed certain items such as orders and stated why I used certain transitions and how I made the clips as they are. However. I felt that when trying to explain about what I liked about the clip and why I did not find any reason to add video effects to them was the hardest and most distressing part of the blog. This is because I only used these clips because I felt that they were really effective one after another and there is only so many ways in which you can say that you felt it was effective. As I only did it because it felt right. however, I did try my best to do so. 

I also believe that I could have used extra sources. I feel that I limited myself with my sources, as I only used two sources for the trailer, as I stated in my storyboard was because they were the characters which I used within the DVD inlay. However, I felt that I didn't have to limit myself. I felt that I could have used more sources for such things as the landscapes and the battle scenes as they are
not directly based on the characters. I think this would be something I would take into account if I was to do this again.

Setting up the Project

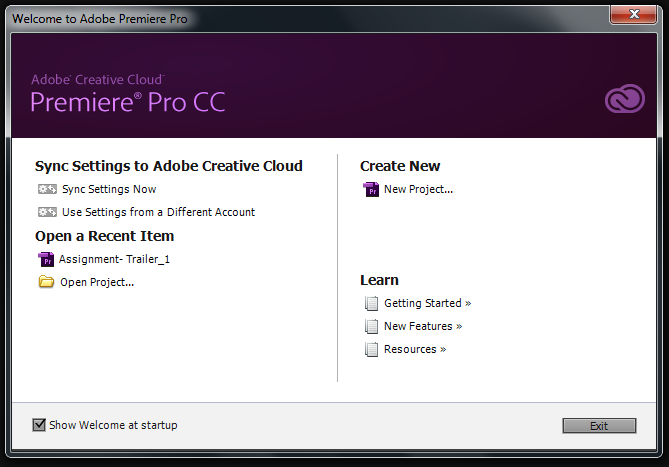
Before I can go one creating the trailer I first of all have to create and set up the project to the specification of the brief. So, to start off I open the program, when the program opens there will be a little menu. This menu allows you to you to do several different items such as open a project you have done before or learn about the software; however, I am going to concentrate on the Create New part of the menu and start by clicking New Project...

Project Menu which opens with the Program
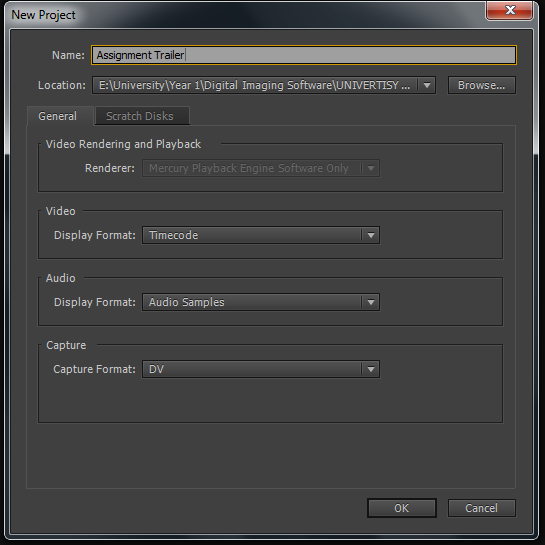
When you click new project a new menu will open. This is where you are able to change some settings for the project if you wish. However, I am going to be keeping all of the settings the same on this project and all that I will be changing is the name of the project to 'Assignment Trailer'. Once I did this I clicked OK. 

New Project Menu
At this point the sequence menu should open, however as I am using a different version of Premiere Pro, this is not the case. If you are using a version of Premiere Pro that is not the Creative Cloud version, then the Sequence Menu should automatically come up straight after the New Project Menu. However, if you are using Creative cloud then there is no worry as all you have to do is just create the sequence manually when the program opens.

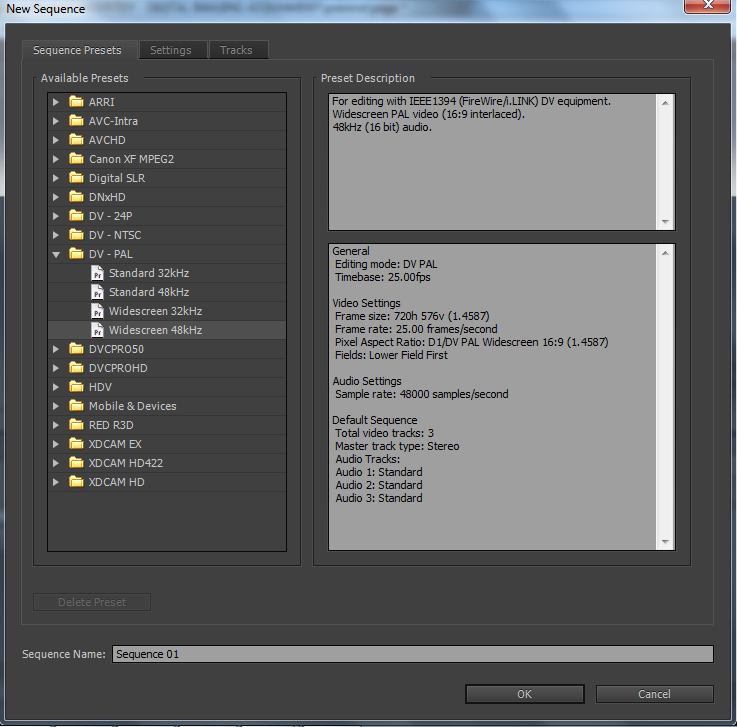
So, to do this you just go to File > New > Sequence. Then it will open the New Sequence Menu. What this menu does is that it allows you to set you video at a different setting depending on how you wish for the the video to be set. For instance, if you were to be using HD quality videos then you would set your sequence under HDV (High Definition Video). However, the brief requires for the video to be set at a certain setting. In this case I will be selecting DV-PAL and then I will be selecting Widescreen 48kHZ. I could have also used the Widescreen 32kHZ, but I thought I would be safer with 48kHZ. Once I have selected the sequence setting for the project I just clicked OK.

I did not change anything else within that part of the menu or other parts. This is because I wanted to keep the project as standard as possible. If you were to go into the settings part of this menu then you can see that you are able to change the frames per second for the project, however this is only optional depending on the setting you have chosen. As I have set my setting to DV-PAL it has set the frames per second at the 25 as that is the standard.

New Sequence Menu
That is the sequence created and so now I can begin on creating my trailer for my project.

Trailer Design Process: Storyboard

Now I have had a look at an existing trailer I am now going to be putting my ideas to pen and paper and create a storyboard for the trailer. A lot of major film companies use storyboards to show what will happen within each scene to the producers and actors or even animation artists which is why I am going to be using a storyboard. This is because I feel this will be the best way to express the idea that I have for the trailer as well as just explaining it, as it would be a visual way of showing what will happen but also will act like a plan for me to say this is what you are doing.

Storyboard

Storyboard for the Trailer
     Here is my storyboard. As you can see it is not as detailed or as well laid out as a professional would have it, but it gives both me and the audience the idea I have. So, to start off the first few seconds will be based on the parental awareness. I used the parental awareness at the start of the trailer because I felt that it was mandatory to have this at the start of the trailer. I am not sure if this is used on the television advertisement for a trailer. However, I know this is used on all trailers on the internet. I thought I would have this because I think it is responsible to have this on a trailer because of the age rating I actually have the film at which is 15.

The next part on the storyboard is where I will have a monologue (idea from the Inkheart trailer but done in my own way). I am not sure how long this will technically last for but I am hoping that this will take up about 20 seconds. I want this monologue to be based on the main character talking about maybe her life or quoting it in some way. I thought this might be quite and effective way to start the trailer. On top of this monologue I plan to have clips of landscapes. I thought this might be a good idea and a good way to gradually open the trailer to action later on in the trailer. I also feel that the landscapes clips will also be able to give the audience and idea of the kind of atmosphere and landscapes that would be used 'technically within the movie'.

After the monologue I want a clip of the main character falling. I thought this would help start to make the trailer become more exciting give the audience a bit more suspense. I thought this would make them question why the main character is falling. The next part after this clip would be based on titles. I wanted to add in titles for the production companies. Some trailer usually have them at the start of the trailers, but I thought they would look quite effective within the middle of the trailer after the character falling. I also have mentioned about these titles being on pieces of paper. I thought this would then bring in the book/page idea into affect into the trailer also I thought it would look effective especially with the writing on the title. This would kind of make it look like writing on a book or a piece of paper.

As you can see from the storyboard that I have the first half of my trailer all planned out from the beginning. However, the second half I was not really sure what to do. On the storyboard all I really have on the story board was rest of trailer made up of action clips. So, I think at this point when creating the trailer I will just be experimenting with different clips and see what kind of order they fall in and one which I am happy with.

However, at the end of the trailer I am wanting a clip where the character is then going to be jumping at the end of the trailer. I think this will be a good way to end the trailer because the character will be jumping and I think it would make people think will they make it!? and I also feel a stunt like that is always the best way to end a trailer as it gives off more suspense. At the very end I then want another title, this title will then state that the film will be coming out soon. I want this clip to only last about 1 second as I do not really want this to last too long that it will take up some time I could use for other clips.

Gathering Sources

At this point I have decided to look up some sources for the trailer. This is where I have decided to use the tombraider walkthough and the film Snow White and the Huntsman. I choose to use these sources as I have used imagery in the DVD inlay which are characters from both of these sources, so I only thought it was only wise to use these clips. I thought it was to make it look more realistic and also it would look a little weird that I had certain images on the DVD inlay and completely different characters on the trailer.

Current Existing Trailers

Now I have completed both my DVD inlay and label I will now be concentrating on my trailer for the movie. The trailer will be created in Adobe Premiere. According to the brief this trailer has to be a minute long. So, I have decided to get some inspiration from existing trailers. This will be able to give me some idea of what kind of clips I could use, ideas for transitions that can be used between each clip, etc.

Inkheart Trailer

This is the only trailer which I will be looking at which are exisiting. I have choose Inkheart because I have have based my ideas and have had many inspirations from this. This is because I have read the book and watched the film and know that the plot of my idea is sort of the same as this except with my own twist and ideas put into it. Also, I have used it as an inspiration for ideas in my DVD inlay and DVD label.

So, I am going to be looking at the Inkheart trailer. As I have mentioned above I have watched the film before and it is a mixture of action and fantasy which is what I want my movie trailer to be due to the plot of the story. As, it has been a while since I have watched the movie I will be watching the trailer again and taking down ideas which I could use or interpretate in my own way.

I found when watching the trailer that it was longer than the one which I will be creating. I am not sure if a minute is the standard size of a trailer for a television advert. However, after watching the trailer I have a few good tips and a few ideas which I thought might help me create the trailer.

There were some ideas I really liked about the trailer. The first one was at the start where it had like a little cartoon animated scene. I really liked the idea, but realized that I only had a certain amount of time to create this trailer and that it would take a while for me to create the animation, which is a shame really, however, I could find a way of  incorporate old worn book or blank pages onto the trailer which would be a good starting point to think about, and could work within the trailer.

Another idea which I have got from the trailer was that the people who created the trailer used a monologue from another part of a film and placed a load of different clips on top of it which did not relate the speech at all. I really like this idea because it makes you feel free because you would think that piece of speech technically goes with the scene so it must stay there. I will definatly be using this idea somewhere in my trailer.

I have also noticed the transitions which they have used within the trailer. I noticed that a lot of them are quite the same in their own respects, but are done in different ways. They almost look like they are dissolving from one part of the trailer to another which I quite like because it make the trailer look really consistent and follows the clips really well. I think I will definitely keep this into account when doing the transitions for the trailer.

Another idea which I really liked from this trailer is that they gradually built up to the action side of the story. They started off soft and gentle scenes and then then gradually started to add more action and fantasy to the trailer, making the trailer look more exciting. Making you feel that you want to go and watch the movie to see what happens. This idea I will definitely be taking and try and recreate in my own way.

The only thing I did not like about the trailer was the narrating, I felt that this really let down the trailer and I definatley will not be using it. I think the clips that are used within the trailer should tell the story of the film not someone sitting there asking questions about it or narrating parts of the story. Personally I think it really lets trailers down.

QualityTrailers, 25th Januaray 2009. Inkheart - Offical Trailer (Watch in HD). Available at: <https://www.youtube.com/watch?v=OfTfDYcwygU> [Accessed 4th May 2014]